Saturday, October 29, 2011

Planning Ahead

So there is a slight lull in wedding sewing! I have only a handful of things left to do, but am waiting on various things such as arranging fittings and confirming the servers to I can make their tunic appropriate sizes, so on and so forth. I have 35 days to go until the wedding, and I think I will have no problem getting everything done, especially with the help of my bridesmaids.

So I am now allowing myself to plan what I want to sew after the wedding and after Christmas. My persona is Florentine, early 1500's and I really only have two or three gowns that reflect that. I have two portraits picked out that I currently can't stop lusting over. I'm not sure why either since puffy sleeves (as are in both portraits) are not really my thing. Perhaps it is the uniqueness and novelty of trying a new style:-)

The first portrait is Bacchiacca's 'Portrait of a Woman with a Book of Music' c 1540.
Why I like this portrait, I'm not really sure...as I said there are puffed sleeves involved and I am really not a big fan of pink. Perhaps it the applique? I am a sucker for that. LOL. This woman strikes me as being someone with a quirky and perhaps a carefree attitude for her time and place. The trim on her gown is definiately unique, and she flaunts it well...having the hem draped over the chair just so to make it extra visible?  My plan here is to make as close a copy as possible, using linen (more affordable that silk) for the majority of the gown, blue/brown silk taffetta for the sash and balzo and rabbit fur to line the lower velvet sleeves. Perhaps I can find some very light weight linen for the partlet thingy and of course, make myself a new camicia, as a girl cannot have too many of those. Things that will be new for me in trying to sew this gown will be the balzo, the ruched baragoni, and fur sleeves.

The second gown I wish to make is the one in this 'Portrait of a Woman' c1530 which is attributed to either Peter de Kempeneer or Girolamo da Corpi. I beleive she is a woman of Ferrara, but the gown is close enough in style to some Florentine and Roman gowns that it will still work for my purposes.
Again, I'm not positive what strikes my fancy so about this particular dress. I do not care for the trim placement on the bodice or the trim color, and again with the puffy sleeves.... Oi! Again, however, I wish to make this gown out of a jade green linen, and perhaps find a copper coloured trim instead of the yellow. I hope to experiment with jewelry for this one, as I suck with jewelry making thus far, and maybe I'll be brave enough to attempt a pair of gloves and a feather fan. Up until this point I have stuck with flag fans, as they are easy and fun to assemble.

The sad part....I have to wait at least two months before I can start with either of them. Hopefully though that will give me enough time to research and plan and plot and find the perfect materials.

Saturday, October 22, 2011

and then I made a few hats....

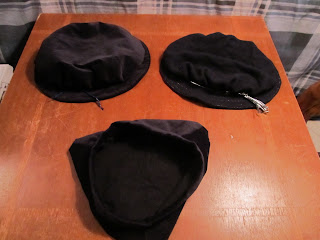
And then I made a few hats for the men in the wedding entourage. Zach already had a hat, but I had made the top too small, so I tore that one apart and made a new top, then added a cord of blue/black and silver lucet cord. It is made from black velveteen. the brim is interlined with several layers of linen and the top is lined with scrap silk.

I made another cap in the exact same style for one of Zach's groomsmen, this one out of a really dark blue wool. I did the visible stitching in silver thread to make it better match the doublet that goes with, and made a silver tassle to hang off the band...not sure I like that final touch at all yet, I'll wait for some masculine input or from someone who knows about hat decorating in the fifteen hundreds.

The third cap I made was my first try at one of the three-cornered hats seen worn by older gentlemen of the period, with a simple band instead of a brim. I'm hoping this one will fit with the pastor and his garb, but again, not sure I like how it turned out.

The picture is kind of lame unfortunately and doesn't really show what they look like on a person's head, and I have a lack of models this week. And once again I am bemoaning the fact that time restraints don't allow for much research. I cringe to think at some of the shortcuts I'm taking for wedding garb, but alas, what else is to be done? I just need to remind myself of the true purpose for all this and stop worrying.

venetian's mens coat

Ok, here's another evidence of lack of research. I have no idea what this garment is technically called, so I've been calling it a coat, I'm pretty sure thats not right. Anyone care to enlighten me? I saw this type of garment in two pictures, several decades apart and both appear to have almost the exact same construction, the first is Lorenzo Lotto's 'Portrait of Febo da Brescia' in 1544 and the other is in Giovanni Battitsta Moroni's 1565 'Portrait of Antonio  Navagero.


Anyway, I wanted to make this coat for my dad to wear to the wedding. He is down in New Mexico until the day of teh rehearsal, and so that gives no time for fittings and no way to get his measurements, and the coat is loose fitting and should easily go over a (not so well fitting) borrowed doublet. However...not that I have it done, and it went so easy and looks so nice, I may have milord wear it over his doublet instead and make another one for my father. We'll see;-) I'm just crazy.

So, I started out with two yards of 60 wide olivy-foresty green cotton velveteen and five big  'grizzly' coloured rabbit hides. The cutting out was pretty simple after I thought about it for a while. I only needed a front/back, the underside of the collar and two outer sleeve pieces.  Here's my diagram;
And miraculously the coat is both long enough and plenty full enough. I was very worried at first. The front of course I slit open down the center front and I cut down a bit more of the neck opening in front. I trimmed the edges of the first rabbit hide, and then cut in half widthwise and stitched the two pieces together side by side for the collar lining. The rest of the garment is lined in plain black cotton. The remainder of the rabbit hides I trimmed down to nine inch strips, and then cut those again lengthwise and placed the narrow edges together and sewed those down to only the black cotton along the front opening edges. For the fur edging around the sleeves I used the long kinda ragged strips from the edges of the rabbit hides and placed those along the outer edge of the black cotton lining for the sleeves and stitched those down. Then I sewed the garment as usual, bag lining it, and topstitching the edges. This was perhaps not the proper way to sew with fur, but i'm very new to working with fur and this was simple and effective. I lengthened the stitch on my machine to avoid perforating the thin rabbit hides too badly and so far there is no tearing:-) We shall see what happens after it has been vigorously worn a few times, and hopefully someday I'll get to make one with a better fur than rabbit.